Chili pests is a huge topic, and I can't possibly cover everything under this umbrella. I've been following several chili growing related and botanical groups and discussions for years and done my own share of fighting the wars against pests with good results. In Singapore's tropical everything grows well including the pest populations! This has provided me with a rich experience and a broad understanding of the most common problems that chili grower may face. Please allow me to share what I've learned so far.
Pest damage indicators
How do you know that you've got a pest problem? Does you chili garden look sad? I've talked and advised hundreds of people when they have this problem. Typically people share a picture of a sad plant and ask for advise with little understanding what could be wrong.
The first step in bug fight: Identify indicators of pest damage
Indicators of pest damage are typically:
Visible insects on leaves, especially on undersides
Small flying insects when shaking the plants
Webbing on leaves and branches
Excessive leaf drop
Whitish webbing or spotting of leaves
Leaves turning brown spotty
Leaves turning white spotty
Excessive flower drop
Curly leaves
Peppers dropping or turning mushy
If you observe any of the above indicators of pest damage it's time to move on to identification and diagnosis of the exact problem. A chili grower will need a couple of simple tools for this job.
You need a loop, microscope or strong magnifying glass. Get one!
Pick out a few leaves that have the indicators of suspected pest damage. Perhaps the leaves have whitish spotting on them, or maybe it seems that there are little brown spots on undersides of the leaves. Inspect the damage with the loop to directly observe the type of the problem. Imagine that you're a doctor doing analysis and trying to diagnose the problem. A doctor wouldn't give medicine to the patient without a proper diagnosis would he? It's because wrong medicine will not work, and it might be harmful for the patient - the chili plant.
It's a good practice to do inspection of plants with a loop every now and then.
Even healthy looking plants might have pests on them, but the population might be small enough not to cause visible problems. It's a good idea to inspect plants periodically to determine when it's right time to start the fight against the bugs. Even an invisible population of pests may lower your yields and slow down growth without you knowing it.
Common types of chili pests
Catepillars
Catepillars are cute but can eat a chili plant bare quickly. One is probably not a problem but a number of them can do real damage.
Simplest way to identify them is to look for catepillar poop below plants. Many catepillars are big enough to be seen easily. Moths and butterflies are among many insects that lay eggs that hatch into these colourful and often furry and pretty buggers.

A spray of any common pesticide below in this article will clear out catepillars. They are easier to handle than many of the smaller pests. Often you can just pluck them off by hand. Just be careful - some of them may be slightly poisonous and sting.

Thrips
Thrips are tiny long-shaped bugs that eat on the sap of the plants. They are about 1 mm long and can be seen on bare eye. They move visibly on the undersides of the leaves, and can be easily identified. Mature thrips can fly around quickly and infect multiple plants. If you find thrips on your chilis it is likely that many plants are already infected. It is best to treat all plants in the garden if thrips problem is detected. Worst thing about thrips? They spread multiple harmful plant pathogens to chilis making them sick. Viruses, fungi and bacteria. I just hate thrips!
Thrips have the ability to lay eggs both in inside of the plant leaves and also to the soil. When treating plants remember to treat the top soil as well. Thrips life cycle depends mainly on the outside temperature and is about 6-17 days. This implies that your bug fight campaign has to take into account the long hatching cycle and adjust accordingly. Maybe you have been able to kill all adults but couple of weeks later they come back from eggs that are still hatching. Do not stop too early.
There are multiple species of thrips. They are one of the worst pests affecting edible plant production, including chili plants globally. Many of the thrips species have become resistant to modern insecticides because of reckless use of insecticides. This means that chili grower has to have several different weapons in his arsenal and he needs to be aware of strategies that prevent thrips from developing further resistance to remaining effective insecticides.
Tactics: Take leaf samples from many plants. Select leaves that have visible brownish spotting or colour changes. Inspect with a loop or magnifying glass. If you see 1mm long yellowish or brown elongated shape bugs that move around rather quickly you have a thrips problem. You can also take a sheet of white paper and shake the leaf. Adult thrips will be easy to see on the paper. Read the insecticides section of this article for remedies.
Image below shows chili plant branches and leaves with thrips damage. New leaves become curled into themselves, might fall off, and even the older ones show curling on the edges.

Thrips damage on old leaves shows up as whitish spots that look like the leaf has burned here and there. Brownish coloration will start to appear quite often.

Below image shows the stages of thrips growth from egg to mature bug.
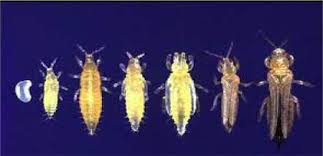
Source: http://site.extension.uga.edu/brooksag/files/2014/06/thrips.jpg
Whiteflies
Whiteflies are small whitish flying insects that can be easily detected from undersides of leaves. They leave a visible whitish webbing on their eggs that can be seen with bare eye. They are very fast propagating and move from a plant to another quickly. If you find whitefly spots on one of your plants you can safely assume that many other plants are affected as well.
Whiteflies suck sap from leaves and slow down plant growth. They lay eggs on undersides of leaves and protect the eggs with a whitish webbing that's easily identified. The whitish substance can be easily wiped off, but this rarely helps to fight the whiteflies. The eggs remain on the leaf surface.

Source: https://www.scidev.net/objects_store/thumbnail/DE386EE5C92562D2CC55F23FF71DB0BD.jpg
Tactics: Inspect undersides of leaves in your chili plants. If you find whitish spotting and webbing on the undersides you probably have a whitefly problem. Lay down on your back under the plant and systematically go through all leaves. Pick out every leaf that has visible infestation on them. Put the infected leaves to plastic bag, close it and discard it. This will slow down the propagation of pests. Plant will quickly grow new leaves, don't worry. Some people will go to the extreme of removing all leaves from the plant. I don't recommend this tactic unless the infestation is very severe. After removing the most infected leaves you still need to get rid of rest of them. Check out the insecticides section below.

Spider mites
If you ask me spider mites are the hardest pest to fully eradicate and the most annoying one. But that's just me. Any pest can actually wreak havoc in the chili garden.
Spider mites are very small arachnids (spider relatives) that live in colonies. They can spread very fast in dry climates and cause significant plant damage. They feed on the sap of the plants like most other pests.
Spider mite damage shows usually as tiny white spotting on plant leaves. It's looks like the leaf has hundreds of pin-size tiny holes that are missing the green colouring. Those white spots are where mites have been sucking the sap from the plant cells.

Spider mites are very tiny, and you won't be able to see them with bare eye. Their eggs look like tiny water droplets of 0.1mm size or smaller. Some spider mites (red spider mite) can be seen with bare eye due to their larger size and red coloring. They move around the leaves quite quickly. Picture below shows two-spotted spider mite and it's eggs.

Source: https://entomology.k-state.edu/extension/insect-information/crop-pests/sorghum/spidermites.html


Tactics: Inspect the plant leaves that have white pinhole spotting or other signs of infection. You need to use a microscope or loop to see the mites. They move around rather fast so inspect the whole leaf surface. Some mites will weave webbing between the leaves that can be seen on bare eye. The webbing is a sure sign of mite colony. Even a few mites on a single leaf can lay multiple eggs and cause visible damage. If you find mites on one leaf you can be sure that the whole plant is affected. Often times you can find mite droppings but not the bugs themselves. Mite droppings are dark spots on top of the leaf surface, and their size is about one third of the mites themselves. The dark spots are sometimes easier to identify than the mites themselves. Mites can move from plant to another in the wind, they can climb the branches and spread very easily. Plants that are around the infected one can be easily infected but show no signs of infection yet. Best tactic is to first quarantine the visibly affected plant. Then pluck off leaves and cut off the parts of the plant that show most signs of the damage. Finally, proceed to read the insecticide section of this article.
Aphids
Aphids aren't the worst of your enemies, but can cause a lot of damage in the crops. They are common in every garden in any zone. They multiply fast but the good news is that they move around the plants rather slowly and their control is relatively easy. Aphids come in various colours and shapes, some being white, brown, yellow or black. But their behaviour is relatively the same.
Aphids suck the dew from the leaves and secrete sweet sugar-rich honeydew on the leaf surface. This attracts ants. Aphids and ants form a symbiosis. Ants will come to collect the sugary liquid and protect aphids from their enemies.
Picture below shows ants tending aphids.

Tactics: Look for misshapen, curling or yellowing leaves. Check the undersides of the leaves where they love to hide. If the leaves or stems are covered in honeydew that's a sign that aphids have been there. Pinch off infected leaves or prune the branches with worst infestation. Also treat the ant problem because ants tend to aphids and protect them from natural enemies. Ant gel has proven to be an effective remedy. Sometimes spraying the plants with pressurised water is enough to clear off the rest of the problem. Using mild soap sprays (1L water, few drops of soap) can also help. As a last resort, check the insecticides section below. If you must, go for pyrethrinum sprays.
Pepper maggots
Perhaps the most gross chili pest is the pepper maggot. It is actually a small fly that lays eggs inside peppers. The fly makes a small hole in the pepper, injects the eggs and they hatch into small worms that fall to soil and later hatch to flies. The maggots feed on the insides of the pepper and spoil it. The peppers turn mushy and fall off from the plant. The maggots will eventually hatch into new flies that lay eggs to new peppers.


Tactics
Pepper maggots can be really hard to eradicate if they set their presence in the local soil. Sprays do not affect them as the larvae live inside the peppers. Systemic insecticides can't be used close to fruiting. So the grower has a dilemma - what to do to control them?
Preventing the breeding cycle of pepper maggot fly is one option. If plants are in urban setup like in hydroponics on a balcony the maggots have nowhere to go after they exit the peppers. They fall on floor and die. But quite often the plants are in soil and maggots try to burrow in and make new flies. In these cases the best you can do is to pick off all infested peppers as soon as possible. Full early harvesting may be the only option if there are many plants. Finding all infested peppers may be impossible.
Systemic insecticides may help but then again, you can't use them close to harvest time. You don't want pesticide residues in your peppers.
Source:
http://ipm.uconn.edu/documents/raw2/Pepper Maggot/Pepper Maggot.php?aid=57
Fungus gnats
These pests are a small flying insects that primarily affect indoor houseplants. They are attracted to the moisture of potting soil.
Gnats lay their eggs on soil surface. The eggs hatch in about three days into larvae. The larvae burrow into the soil and eat fungi dead plant material. In about two weeks gnats emerge from the and the cycle repeats. Adults live about a week and lay roughly 200 new eggs each. Life cycle of a fungus gnat is about 3-4 weeks.

Small number of fungus gnats is rarely harmful for plants. They are, however, sometimes very irritating indoors. Nobody really wants to have small flies around indoors. Gnats can multiply fast and start damaging plant roots.
Fungus gnats are small flies, about 1.5-3mm in length, about the size of a fruit fly. If you inspect the soil of the infected plants you can often see them crawling across the soil and drainage holes. The gnats are smaller than mosquitoes but may resemble them because they have long thin legs and wings.
Tactics
Getting rid of fungus gnats takes some time. Their life cycle is roughly a month, out of which most is spent under the soil. Getting rid of them will take at least for two weeks. You can use sticky yellow traps or flypaper - place close to top soil to trap adults. This, however will rarely get rid of them completely as some still have time to lay hundreds of new eggs to soil. Sticky traps will mostly keep the adults away from humans, but do little to eradicate them.

You can also use mosquito dunks to kill the gnat larvae in the soil. The mosquito dunks contain a beneficial bacteria that kills the larvae. Take the dunks, break them into small pieces and dissolve into water. Use regularly to water the plants.

You can also cover the top soil with couple of centimetres of sand. This will break the breeding cycle of fungus gnats. The existing larvae will hatch normally from soil and become adults. But the adults can’t access the soil anymore because of the dry thick layer of sand. This will get rid of the gnats in couple of weeks time. Their numbers will go down gradually and they will disappear after the hatching cycle ends. Prevention of gnats is based on the same idea. Do not overwater. Keep the top soil mostly dry. This creates a natural dry barrier of soil that discourages them from breeding. Remember to cover the gnats access to pot drainage holes if you have a problem with them. You can put sand under the pots etc.


Control
What is control? It's simply a term that implies that you're in charge of the pest situation. Your aim is to reduce or eradicate the problem to an acceptable level. There's often some number of pests in any outdoor garden but they're usually appearing in low enough numbers not to cause much trouble. It's just when conditions are right when pests may multiply in numbers and you need to intervene to get the pest problem under control.
Choose the right control for the right situation. Don't go for insecticides right away. Think first before doing anything hasty!
The following chapters will simply make a list of different options that you can use for controlling pest problems rather safely. Choose the right control for the right problem.
Quarantine
Quarantine should be the first thing in your mind when you suspect a pest problem. It means that you remove the affected plants from the vicinity of other plants and treat them separately. This way you can limit the problem from spreading to other plants and you need to do less work to fix the situation.
Quarantine, pruning and picking off infected leaves is sometimes enough to solve the problem!
Key question is are the pests only affecting one plant, or are they already affecting many? If you are lucky or diligent enough to find them early you can use quarantine. Here's the guideline:
If you find that only one or few plants are affected, it's time to go for quarantine.
Treat the infested plants in quarantine.
After quarantine of affected plants inspect other plants to make sure the problem hasn't spread to them. Maybe you didn't just find the bugs there!
Return plants back to their original place only after you're sure the pest problem is solved.
Quarantine option works well with the following pests: Aphids, spidermites and mealybugs. Thrips and whiteflies tend to move from plant to another so easily that quarantine isn't always an effective way to control them.
Pruning / picking leaves / water spraying
I've already mentioned this above, but let's say it again - picking off leaves or pruning (cutting off parts of the plant) are very good way to limit the spreading of the pest infestation. When you find leaves or branches in plants that are heavily infested take those parts off. Discard them in plastic bags and dispose them immediately. It's best not to compost these plant parts as the eggs of some pests will make it through composting and will come back bugging you once you use the compost.
Don't kill your plant by taking too harsh actions!
I've read comments where people advise plucking all leaves off plants to solve a pest problem, or cutting it all the way down to the stem. But this strategy isn't going to be effective if the pests have laid eggs on the top soil, or some remain in the plant, or if their eggs are deposited on branches. You shouldn't cause more damage than the pests would do.
Water spraying is another way to fight some pests. Especially aphids and spider mites can be treated this way pretty well. Aphids are slow moving and come off the plant easily with the spray. Spider mites don't like moist conditions, so water spraying will at least make them feel very uncomfortable. Some people use a hose, some take the plants to shower and spray them from top to bottom all the way. It's worth a try.
Insecticides
Insecticides is a huge topic in itself. We're covering here information about good practices and information on a few safe choices of insecticides. But before we jump into that, let's discuss a bit about both false sense of security and fears of insecticides. There's a lot of emotions and very little real knowledge going around gardener discussions and Internet posts. People tend to trust something that they feel is safe but they don't know it is. The home brew insecticide recipe from neighbour auntie feels better than industrially produced chemical, does it? This is far from the truth.
First rule of thumb is to use only substances you can trust to be safe. What is safe?
Safe is something that's been thoroughly tested and scientific evidence shows how effective and safe it is. Period. You have to know how safe it is before you start applying anything on your garden! This means don't use anything that doesn't fit that bill. No home cooked recipes, no folklore, no auntie's best recommendations. Only science and safety certified products. You do need to do some studying to get the facts right.
Bottom line: Home cooked insecticides are not safe. You can't trust their safety. Don't use them!
Certifications, safety period time and application instructions
All scientifically tested and commercially available insecticides have gone through safety testing and include instructions on safety period times and their application. You can easily find safety testing reports for these products and substances. The containers must have adequate application instructions and safety information for the consumer. Reading through the official safety certification reports will probably be a little technical but if you have time please do so. It's really better than just relying on this blog.
Firstly, all products you buy should come with:
Application instructions - dosage, how much and how often to apply the insecticide?
Safety period time - how long do you need to wait with different plant types until they can be safely eaten? Can you even use the product on consumables?
What kind of protective measures you need when applying?
If either of these instructions are missing you either have to go online to find the safety certification test reports, or you better not use the insecticide at all.
Click this link to search EU's pesticide database.
Here's how to read the database search results. Let's say you're looking for pyrethrines (active ingredient in many retail pesticides). Once you search you'll end up on the active substance detail page. Best way to understand is to click on the review report link and download the PDF file. For example, for pyrethrines you will get the following document:
Scroll to the section "Overall conclusion" to quickly get an understanding of the subject. You'll find the following explanation: "...it may be expected that pyrethrins does not have any harmful effects on human or animal health or on groundwater or any unacceptable influence on the environment...".
This overall conclusion comes with limitations that you'll need to read from the report yourself. The limitations will include safety time, application instructions, practically all the stuff that we've already talked about above. That's safety.
Safety certifications of pesticides
Don't use any pesticide that hasn't been safety certified. That's it.
Very simple. Next chapter.
Systemic / contact / selective insecticides
Some insecticides are systemic, and others work on contact, some are selective. What do these terms mean?
Systemic insecticide is a substance that is absorbed by the plants, and then pulled to the leaves and branches. The substance enters the plant and makes them toxic to the pests that try to eat them. Typically a systemic insecticide can have a lengthy safety period time for consumables because it will be present in the plant for a long period of time, sometimes for a month or more. Plants and peppers may still be safe for consumption but safety instructions that are mentioned with the certification guidelines should still be followed. Systemic insecticides mentioned in this article should be relatively safe for edible plants.
Contact insecticide is a substance that works when it comes in contact with the pests. This means that if you spray plants and the spray hits the bugs they will usually die fast. If you miss the bugs they may not be killed, unless they walk in to that pesticide. These insecticides often work for a shorter time than systemic insecticides because they are more easily broken down by UV radiation of sun, or flushed off the plant by rainwater. Hence, they need to be applied more often than systemic insecticides.
Contact insecticides and systemic insecticides don't make difference between friend and foe. They kill also beneficial insects like bees. Apply them correctly.
Selective insecticides work on certain pests but not on others. Most desirable ones are the kinds that kill harmful pests but don't harm useful ones like bees. Selective insecticides are usually rather new innovations and should be less harmful for friendly insects. They are also often less well known even by the gardening professionals and may be hard to find from stores. You'll also notice they are often more expensive. Good but pricey.
Word about pest resistance
If you decide to use insecticides you should be aware of the risk that pests may develop resistance to them. Pest resistance happens when insecticides are applied incorrectly and few pests survive the effects of pesticide. These few may be a bit more resistant than the rest of the population. When this cycle repeats often enough you may end up with a population of pests that can't be effectively controlled with the insecticide anymore. Guess what happens next? That strain will continue spreading and may render that pesticide useless for everyone in the world eventually. This is a matter of responsible use above all.
Follow the application guidelines of pesticides to prevent pest resistance.
When insecticide is applied, it should be applied consistently to the whole plant.
Concentration of the insecticide must be according to guidelines. Not too mild, not too strong.
Rotation of insecticides is another strategy that should be applied. Rotation means that you should apply different kinds of insecticides in rotation if you use them. Rotation makes sure that those pests that may have some resistance to substance A don't survive when substance B hits them. This is especially important in greenhouse environments where pest control happens in large scale. But I think that every grower should know the basics of responsible insecticide use. Switch between at least a couple of safe insecticides in rotation to prevent pest resistance.
Insecticides
Let's jump to the substances then, shall we? I know you've been waiting for them! I've spoken to hundreds of people. Most of them have expressed their desire to stay with non-toxic, or natural methods. This opinion comes up especially when they don't have any serious problems with pests.
But. As soon as people face a difficult pest infestation they often change their minds and start asking for effective solutions.
Brutal facts: Every insecticide is natural. Everything in the world is toxic if the quantity is right.
Desire for "natural" things is based on bias, or fallacy, to believe that something that originates from natural environment or plants is safer and healthier. This is not true. Scientifically proven safety testing creates safety, not tendency to like or believe in natural things. Besides, every single thing in this world is "natural" and obeys the same forces of physics, chemistry and other natural laws. Science, baby! That's the real definition of natural.
How about the quantity? Exposure level? I've had number of people telling me that "I'm afraid that even the tiniest amount of this chemical will grow me a tail". Well, not really a tail maybe, but let me tell you a fact. Drink enough dihydrogen monoxide and you'll surely die! That's water. The amount makes a poison.
Bottom line: Use safety approved insecticides according to their application guidelines and you'll be safe.
Do not use insecticides unless you really have to. Almost every insecticide will knock out also useful insects that may be helping you to fight the pests. When broad-spectrum insecticides are applied, they will often kill the useful insects but leave some of the harmful ones alive. This results to secondary outbreaks of pests later after application. The situation may look good for a while but then the pests come back.
Secondary outbreaks of pest mites often result from the mortality of predatory mites following the use of broad-spectrum pesticides.
Neem oil
Neem oil can be used both as a foliar spray and as a systemic insecticide when drenched to soil. The oil has a half life of three to 22 days in soil, but only 45 minutes to four days in water. It is very safe to use if applied properly. Neem oil breaks down very quickly, too. It is especially susceptible to UV light on foliage. So apply it on foliage on evenings. Plus, spraying it on evening prevents killing any beneficial insects like bees. Bees only work on day shift!
If you use neem on soil it is absorbed by the plant and distributed throughout the tissue. Once the product is in the plant’s vascular system, insects intake it during feeding. Use a diluted oil, not pure extracts for soil. Make note that it will not work on all bugs if drenched on soil.

Neem oil can damage foliage of some plant species when sprayed on foliage. Test your plants by spraying small area on the plant and wait 24 hours to check for damage. Apply neem oil in the evening to avoid foliage burning under the sun. Reapply about once a week. Apply to all leaves until they are completely coated.
Neem oil can be used to control: Aphids, Mealybugs, Scales and Whiteflies and hundreds of other insects.
Resources:
Pyrethrins
Pyrethrins are a class of organic compounds that target the nervous systems of insects. Pyrethrin naturally occurs in chrysanthemum flowers and is often considered an organic broad-class insecticide (works on almost all insects). Pyrethrins are biodegradable and are low-toxicity pesticides from a human health standpoint. Most commercial products combine pyrethroids with piperonyl butoxide which makes it more effective against insects at lower doses. Pyrethrins are one of the safest insecticides available.
Make a distinction between pyrethrins and pyrethroids. The latter are synthetic analogues for pyrethrins but do not degrade in environment equally well. If you have a chance, prefer pyrethrins over pyrethroid products. Don't toss pyrethrin products on drain. They will damage the aquatic life.
Bees are very susceptible to pyrethrins and will die if they are exposed to even tiniest amount of this substance. Limit spraying to evenings to prevent bee casualties.
Pyrethrins are applied as a spray on plants. Cover the whole plant with the spray, including the undersides of the leaves.
Pyrethrins can be used to control: Aphids, Mealybugs, Scales and Whiteflies and hundreds of other insects. It works even on ants. Broad spectrum contact insecticide.
Resources:
Spinosad
Spinosad is a natural substance made by a soil bacterium that can be toxic to insects but not so much for mammals like you and me. It is a mixture of two chemicals called spinosyn A and spinosyn D. It is used to control a wide variety of pests.
Some spinosad products have been approved for organic agriculture. When used correcly they are very safe for humans. Spinosad affects the nervous system of insects that eat or touch it. It causes their muscles to flex uncontrollably. This leads to paralysis and ultimately their death, typically within 1-2 days.
Perhaps the best thing about spinosad containing products is their safety for people and beneficial insects. Spinosad is somewhat selective about what it kills.
Spinosad is safe for adult butterflies and many insect predators and parasites.
Spinosad is rapidly broken down by sunlight. Therefore it has a short half-life of few days only. Organic farmers love it because it can be used for edibles safely.
Spinosad is typically applied as a foliar spray on plant leaves. It works as a contact insecticide. Some studies have shown that spinosad works also as a systemic insecticide if it is applied to plants that grow on artificial medium like rockwool. In this case spinosad is applied to the growing medium and plants absorb it from there. Please note that this approach was not effective when applied to soil. Top soil usually absorbs spinosad and prevents it from progressing to the plant tissue.
Personal observation: I have a hydroponic / aeroponic system from Aerospringgardens. This system supports up to 36 plants. Each plant is inserted in the system in a rockwool cube. I encountered a fairly serious whitefly problem. Then I read an article on systemic application of spinosad on rockwool medium. I quickly summarised in my mind that finding and counted in the half life of spinosad on water which is fair bit longer than in foliage when exposed to sun. The article mentioned a dosage of 2ml / plant. So I set to test this myself on aeroponic setup that has rockwool cubes on root bases. I injected 1.5 ml per plant to the rockwool cubes. My thinking process was that some of the substance will be absorbed directly from cubes, and some will circulate in the system through water drip. In the mean time I kept on plucking off infected leaves from the plants. Four days later there is no sign of whiteflies in any of the plants! In this test case scenario the systemic application seemed to work!
Spinosad is especially effective against thrips.
Thrips may be very hard to eradicate with other insecticides but this one really does the job.
Unfortunately some varieties of thrips have become resistant to this pesticide due to its overuse in agriculture.
Spinosad can be used to control: thrips, leafminers, spider mites, mosquitoes, ants, fruit flies and many other insects.
Resources:
Abamectin
Abamectin is a broad-spectrum contact insecticide. It is derived from the soil bacterium Streptomyces avermitili. Abamectin is used to control pests in agronomic, fruit, vegetable and ornamental crops. Abamectin attacks the nervous system of insects and mites and causing paralysis within hours.
Abamectin is highly toxic to fish and aquatic invertebrates. Do not dispose of it in drain!
Abamectin is toxic to bees but it dries up and degrades on foliage fast because it degrades under UV light quickly. Abamectin is almost insoluble in water and tends to bind to top soil. It is therefore immobile in soil and does not contaminate ground water. It degrades in soil rapidly due to UV radiation and soil bacterial activity. Perhaps for this reason plants do not absorb abamectin from the soil. The substance is not systemic. It can be used as a spray on foliage only and works on contact with pests. On foliage it will degrade under sun's UV radiation quickly. Half-life of abamectin on foliage is short, only 4-6 hours. As it degrades fast it is suitable for edible plants even during flowering and fruiting phase of production.
Abamectin is suitable for use in organic farming and for IPM, Integrated Pest Management programs.
Apply abamectin as a spray once in 2 weeks. After application you may notice the pests are still on the plant even though they are dead. This is due to the fact that they are “sticky” in nature. When using a 2% concentrate of abamectin mix 1 ml per 2L of water. You can use a syringe to measure the right amount for a spray bottle (many hand-held bottles are roughly two liters capacity).
Abamectin can be used to control: Insects with Scales, White Flies, Caterpillars, Ants, Spiders, Leaf Eating Mites, Sucking Pests, Trips, Lice, Worms, Leaf Miners, Aphids and Spider Mites.
Resources:
Predatory mites
Basically predatory mites are friendly critters that eat spidermites, thrips and other harmful insects. No need for commercial insecticides. Sounds good, right? This is a much preferred method for people who dislike insecticides. There are multiple species of useful predatory mites available for different crops and pests. The predatory mite that may do best outdoors in most environments is the western predatory mite (Galendromus occidentalis). Suppliers may use other names for the western predatory mite, such as, Typhlodromus occidentalis or Mesoseiulus occidentalis. They are usually sold online by local manufacturers.
There's limitations to this method though. First of all, these mites may not be available in all counties. This may be due to environmental factors or commercial availability. Second, predatory mites need to be shipped in temperature controlled packaging so they can't be easily shipped globally from production sites. Availability depends usually on local availability of production. They are sensitive to heat and humidity.

Predatory mites are excellent option for managing thrips and spider mites
Application of friendly predatory mite (your friendly neighbourhood mite?) is best done in combination with insecticides that have a short half-life. First apply a “soft” pesticide, such as insecticidal soap or horticultural oil, before introducing predators. The idea is to knock the pest mite population down and wait for the insecticide to degrade, so the predator introduction can be more effective. Apply insecticide preferably several days before the release. This strategy will improve the effectiveness of the predatory mites.
Predatory mites can be used to control: Spider mites and thrips
Resources:
Finally, there are multiple other options for pest control. This article only mentions those that I have found to be safe and effective. If you decide to use other options please follow the validation process that is described in the safety part of this article.
Good luck with fighting the war on pests!
-Chilious